The website footer is one of the most overlooked areas of a company’s website. Learn why it deserves more attention and how to optimize it to improve Google ranking.
1. Why is the website footer important?
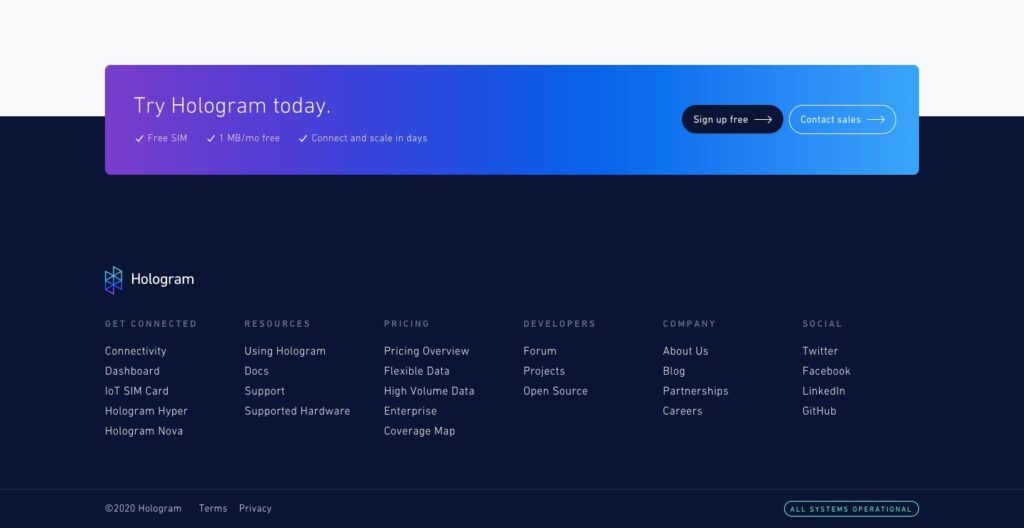
The website footer is located at the bottom of a web page and repeats some elements of the header/body copy, in addition to the fine print and copyright notices.

Website footer increases visibility. It provides important information to the visitors that they don’t easily find on the main menu (About, Blog, Contact us). Therefore, here’s a breakdown of why a website footer is an essential element of any site:
- The website footer gives visitors one more chance to take the desired action. If you want visitors to sign up for your mailing list, view a product demo, or contact you, you can invite them at the end of a scroll. This is an effective call to action like the CTAs at the end of ads.
- The website footer presents a path to continue engagement. The navigation links in the website footer make it easy for the visitors to keep exploring without forcing them to scroll back up.
- The website footer provides access to important information such as copyright info, privacy statements, legal disclaimers
2. What to include in your website footer?
Copyright: In order to protect your website footer against plagiarism, have a year and the copyright symbol on the footer of your page.
Sitemap: An HTML version of a sitemap is useful for Google to find and index pages on your site. This is the most common link found in the website footer which links to the HTML version of the sitemap.
Terms of use: This helps visitors with the legal discourse of your website where they agree to use your service of products.
Privacy policy: The link in the website footer can document to users the information the website collects, stores, and uses.
Contact us: A contact information link is very important if you want a good user experience. The “Contact us” link or submission form will help users find the information they are looking for to get in touch with you. You can add your customer care email, phone number, and office address to this link.
Social icons: Place the social icons at the bottom right-hand corner of the website footer. The footer is the best place to add icons that take users to social networks.
Email signup: A subscribe button to send interested visitors your company newsletters, promo emails, and updates.
Besides, other elements to include in the website footer such as image gallery, mission, and values, awards and certifications, testimonials, latest blogs, and articles, call to action
3. Why website footer links are important for SEO?
Website footer links can make or break your Google ranking. Therefore, incorporating the right amount of links in your website footer will help visitors navigate around your site.
Redirection: When the visitor reaches the end of the website, what do you want them to do? Give them a more interesting experience. Links on the website footer will redirect your visitors to another page of your website. This can help your site get more traffic and have a better google ranking.
Mobile friendly: To generate and convert more leads on your website, you need to optimize your website for mobile use. It is easier to scroll on a phone and their footer link helps them navigate through the website easily.
More links, higher SEO rank: Every single link on your website footer is analyzed for SEO ranking. Therefore, make sure that you keep just the right amount ready for visitors to follow.
4. How to optimize the footer for search engines (SEO)
A unique design is compulsory to attract visitors to stay on your website till the end. However, good SEO also gives your entire site more authority because of the number of keywords, relevant content, and links in the website footer.
Keyword: The website footer is the right place to indicate your relevance to Google. If you include your mission, value statement, or about us, this is a good opportunity to include your primary keywords. Many SEO experts have abused website footer text for keywords. Try and use your keywords as text, not a link. New scripts are able to see if a visitor came from a search engine and what keyword they search for.
Anchor text: It is an important part of the website footer. In addition, it unlocks every potential link. Google uses external anchor text (text other pages use to link to your site) to see how other sites view your page. Although it is difficult to control how other sites link to your website, you can focus on the internal anchor texts used in the website footer. Besides, understand what type of anchor text and longtail keywords to use to research. And you can think about what users search for when they look for a product or service.
We look at the website footer as an important extension of the top navigation. The best website footer will act as a safety net for your users and help conversion rates by acting as a strong roadmap to the rest of your site.
5. How to edit the Magento footer menu?
Method #1: Add the menu to the CMS block
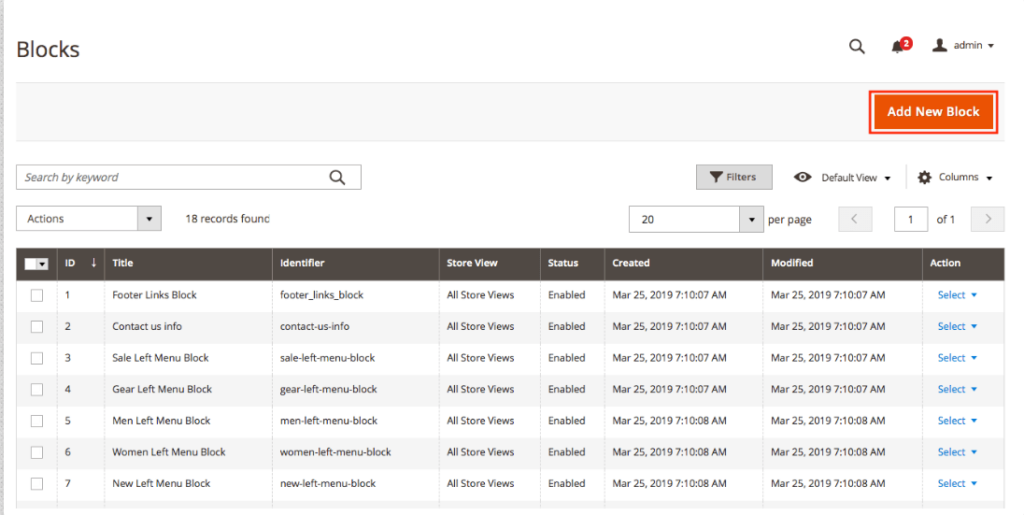
1.Log into Magento 2’s admin panel and go to Content -> Blocks. Add a new block by using the Add new block button.
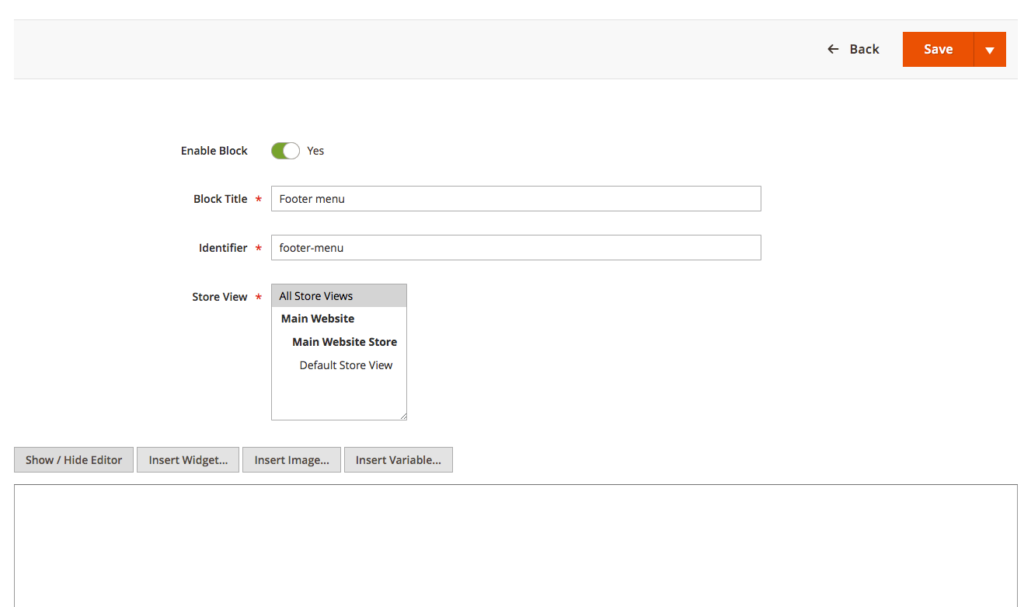
- To avoid any problems, open the Show/Hide Editor and type in the following code:
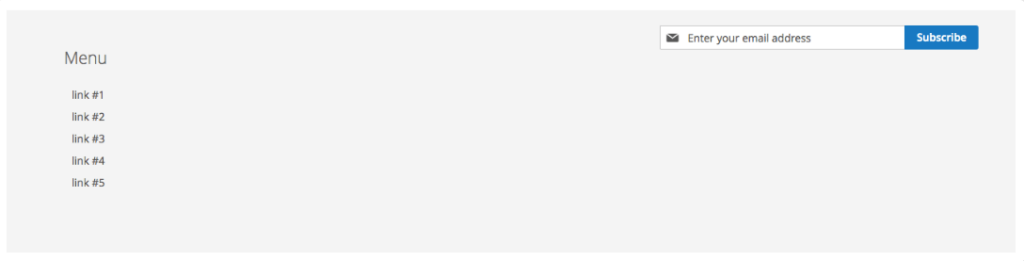
<div class="menu">
 <h4>Menu</h4>
 <ul>
 <li><a href="#">link #1</a></li>
 <li><a href="#">link #2</a></li>
 <li><a href="#">link #3</a></li>
 <li><a href="#">link #4</a></li>
 <li><a href="#">link #5</a></li>
 </ul>
</div>- Save the block
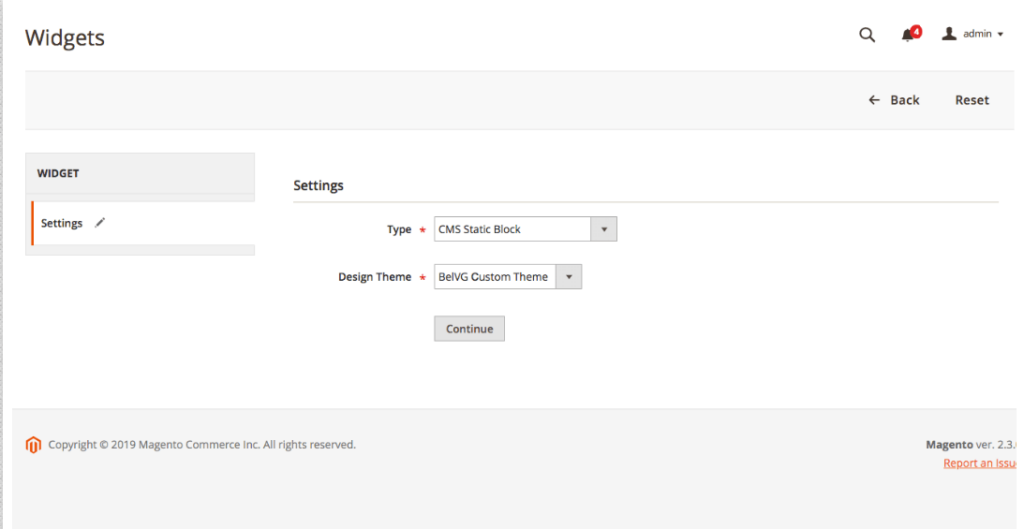
2. Add a new widget by going to Content > Widgets. Press Add Widget, then pick CMS Static Block in the Type section and your theme name in the Design Theme form. When you’re done, click Continue.
- The fields below will display; fill them out as shown in the screenshot below.

- Select the CMS block we built in the Widget Options tab.
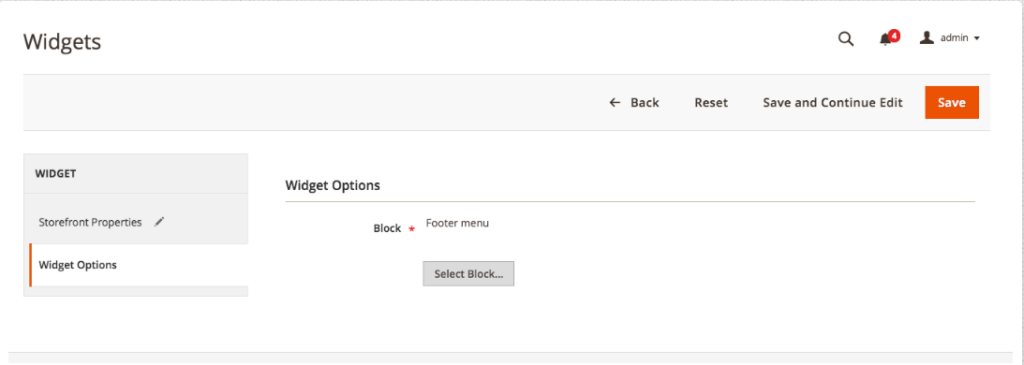
- In the top right corner, press the Save button. If the following options display, you have completed all of the steps correctly.
3. Add to your menu by making:
– folders and files for the styles:
mkdir -p app/design/frontend/BelVG/Name of the theme you created/Magento_Theme/web/css/source/
touch app/design/frontend/BelVG/Name of the theme you created/Magento_Theme/web/css/source/_extend.less
– our menu’s fundamental style:
@menu__font-color: #666;
@menu__transition: all 0.1s ease-out;
& when (@media-common = true) {
 .footer {
 &.content {
 .menu {
 float: left;
 width: 100%;

color: @menu__font-color;

padding: 30px;

h4 {
 margin: 0;
 padding-bottom: 5px;

font-size: 22px;
 font-weight: 300;
 line-height: 1.2;
 }

ul {
 margin: 0;
 padding: 20px 0;
 }

li {
 font-size: 14px;
 line-height: 1.5;
 }

a {
 padding: 3px 0 3px 10px;

color: @menu__font-color;
 .lib-css(transition, @menu__transition);

&:hover {
 padding-left: 20px;

color: @color-blue1;
 text-decoration: none;
 }
 }
 }
 }
 }
}
The following is the style you will receive:
Method #2: Edit the footer menu with the layout
If you don’t need to update the menu’s entire structure, but just want to add or remove a block, I recommend using this approach.
To alter the layout of the footer menu, you must first determine whether the theme is installed in the app/design directory or in the vendor directory. Go to FTP and navigate to the Magento folder, then the app/design folder. In case the latter is empty. So the vendor folder contains either a standard or a third-party theme.
In my example, I’m using the Luma theme (vendor/Magento/theme-frontend-luma) as an example. Create a custom theme and conduct theme inheritance before you begin modifying.
1. Make the necessary folders and files.
mkdir app/design/frontend/BelVG/Name of the theme you created/Magento_Theme/{layout,templates}This is how our layout and templates are organized into folders.
touch app/design/frontend/BelVG/Name of the theme you createdMagento_Theme/layout/default.xml2. Add the default.xml’s initial layout.
<?xml version="1.0"?>
<!--
/**
 * Copyright © Magento, Inc. All rights reserved.
 * See COPYING.txt for license details.
 */
-->
<page xmlns:xsi="http://www.w3.org/2001/XMLSchema-instance" xsi:noNamespaceSchemaLocation="urn:magento:framework:View/Layout/etc/page_configuration.xsd">
 <body>
 <referenceBlock name="footer_links">

 </referenceBlock>
 </body>
</page>
3. Remove all of the footer links that aren’t essential (I will delete Advanced Search as an example). In the footer links block, add the following line:
touch app/design/frontend/BelVG/Name of the theme you createdMagento_Theme/layout/default.xmlwhere name denotes the name of the block we’re removing.
Remove the menu block from the cache memory by clearing the cache memory:

The following is a list of common menu block names:
- Search Terms — search-term-popular-link,
- Privacy and Cookie Policy — privacy-policy-link,
- Catalog Search Advanced Link — Advanced Search,
- Sales-guest-form-link – Orders and Returns
- Contact us – contact-us-link.
4. Customize the About Us page with a personalized link. To the footer_links block, add the following code:
<block class="Magento\Framework\View\Element\Html\Link\Current" name="about-us" before="search-term-popular-link">
 <arguments>
 <argument name="label" xsi:type="string" translate="true">About Us</argument>
 <argument name="path" xsi:type="string">about-us</argument>
 <argument name="attributes" xsi:type="array">
 <item name="target" xsi:type="string">_blank</item>
 </argument>
 </arguments>
 </block>
where:
- label – the name of the link.
- path — a link to our website (either absolute or relative),
- attributes — this block is in charge of tag attributes.
The following is a list of the most often used tag attributes:
- name — creates the document’s anchor name;
- rel — the connection between the current document and the one to which we’ve linked;
- target – When you click a link, the document opens in the current window or frame by default. This attribute can be used to alter this condition if required.
- title — gives the link text a tooltip.
We utilize the block characteristics after and before to determine the order.
Method #3: Create a menu template from scratch
It’s better to create a different menu template if you want to entirely change the footer menu structure.
Create the theme as instructed in approach #1 and finish steps 1 and 2 before continuing.
1. Add the following layout to app/design/frontend/BelVG/Name of the theme you created/Magento_Theme/layout/default.xml:
<?xml version="1.0"?>
<!--
/**
 * Copyright © Magento, Inc. All rights reserved.
 * See COPYING.txt for license details.
 */
-->
<page xmlns:xsi="http://www.w3.org/2001/XMLSchema-instance" xsi:noNamespaceSchemaLocation="urn:magento:framework:View/Layout/etc/page_configuration.xsd">
 <body>
 <referenceContainer name="footer">
 <referenceBlock name="footer_links" remove="true" />
 <block class="Magento\Framework\View\Element\Template" name="footer.navigation.menu" before="-" template="Magento_Theme::footer_menu.phtml"/>
 </referenceContainer>
 </body>
</page>
Where:
<referenceBlock name="footer_links" remove="true" />The previous menu is removed.
<block class="Magento\Framework\View\Element\Template" name="navigation.sections" before="-" template="Magento_Theme::footer_menu.phtml"/>Magento Theme::footer menu.phtml template inserts our own block.
Create the template as follows:
touch app/design/frontend/BelVG/Name of the theme you created/Magento_Theme/templates/footer_menu.phtmlAdd the following code to the footer menu.phtml:
<div class="menu">
 <div class="menu__column">
 <h4><?php echo __('First Tilte')?></h4>
 <ul>
 <li><a href="#"><?php echo __('Customer Sevice')?></a></li>
 <li><a href="#"><?php echo __('Faq')?></a></li>
 <li><a href="#"><?php echo __('Shipping Information')?></a></li>
 <li><a href="#"><?php echo __('Site terms & Conditions')?></a></li>
 </ul>
 </div>
 <div class="menu__column">
 <h4><?php echo __('Second Tilte')?></h4>
 <ul>
 <li><a href="#" title="<?php echo __('About Us')?>"><?php echo __('About Us')?></a></li>
 <li><a href="#" title="<?php echo __('Privacy Policy')?>"><?php echo __('Privacy Policy')?></a></li>
 <li><a href="#" id="open-map" title="<?php echo __('Contact Us')?>"><?php echo __('Contact Us')?></a></li>
 </ul>
 </div>
</div>
Add to the Contact Us link a map:
<script>
 require(
 [
 'jquery',
 'Magento_Ui/js/modal/modalToggle'
 ],
 function(
 $,
 modalToggle
 ) {
 var options = {
 title: 'Contact Us',
 type: 'popup',
 responsive: true,
 contentSelector: '#popup-map',
 toggleEvent: 'click',
 innerScroll: true,
 };
return modalToggle(options, '#open-map');
}
);
</script>
<div id="popup-map">
<iframe src="https://www.google.com/maps/embed?pb=!1m14!1m12!1m3!1d1992.5997417996828!2d27.51397443607992!3d53.90672151661629!2m3!1f0!2f0!3f0!3m2!1i1024!2i768!4f13.1!5e0!3m2!1sru!2sby!4v1553770504758" width="100%" height="450" frameborder="0" style="border:0" allowfullscreen></iframe>
</div>Where:
options — configuration of our popup for the map,
modalToggle(options, ‘#open-map’) — calls our popup,
<iframe> — tag to embed the map.
2. Add to your menu by making the following:
– style folders and files
mkdir -p app/design/frontend/BelVG/Name of the theme you created/Magento_Theme/web/css/source/
touch app/design/frontend/BelVG/Name of the theme you created/Magento_Theme/web/css/source/_extend.less
– our menu’s fundamental style:
@menu__font-color: #666;
@menu__transition: all 0.1s ease-out;
& when (@media-common = true) {
 .footer {
 &.content {
 .menu {
 .lib-vendor-prefix-display(flex);
 .lib-vendor-prefix-flex-wrap(wrap);
 box-sizing: border-box;
 float: left;
 width: 100%;

color: @menu__font-color;

padding: 30px;

&__column {
 display: block;
 width: 100%;
 }

h4 {
 margin: 0;
 padding-bottom: 5px;

font-size: 22px;
 font-weight: 300;
 line-height: 1.2;
 }

ul {
 margin: 0;
 padding: 20px 0;
 }

li {
 font-size: 14px;
 line-height: 1.5;
 }

a {
 padding: 3px 0 3px 10px;

color: @menu__font-color;
 .lib-css(transition, @menu__transition);

&:hover {
 padding-left: 20px;

color: @color-blue1;
 text-decoration: none;
 }
 }
 }
 }
 }
}

.media-width(@extremum, @break) when (@extremum = 'min') and (@break = @screen__m) {
 .footer {
 &.content {
 .menu {
 width: 50%;
 padding: 0;

&__column {
 display: block;
 width: 50%;
 }
 }
 }
 }
}

.media-width(@extremum, @break) when (@extremum = 'max') and (@break = @screen__m) {
 .footer {
 &.content {
 .menu {
 ul {
 &:not(:last-child) {
 padding-bottom: 30px;
 }
 }
 }
 }
 }
}
Clear the cache and put the static in place. You’ll receive the following:
rm -rf pub/static/* ./var/view_preprocessed/* ./var/page_cache/* ./var/cache/* ./var/generation/*
bin/magento setup:static-content:deploy
Conclusion
Website footer plays an important role in Google ranking, therefore through this post, we hope you know the way to optimize it effectively. If you meet any challenges in this process, you can contact us via contact form. Besides, you can visit our Magento Website Development service to find more about helpful things for your store.