Facebook Pixel is an analytic tool that will assist you to decide the effectiveness of your Facebook ads. You can easily check and evaluate the actions and the way users interact with your ads and behave on your website as a result of the ad. Every eCommerce website can benefit amazingly from Facebook Pixel by increasing more sales. If you wonder what adverts are most effective, how users consume your content, and how to deliver appropriate ads to your potential customers? Reading this blog will help you using and setting up your Facebook Pixel in Magento 2 store
What is Facebook pixel?
The Facebook pixel is code that you insert on your website. It gathers data to assist you in tracking conversions from Facebook ads, optimize ads, generate targeted audiences for future ads and remarkets to visitors who have interacted with on your website. It works by inserting and triggering cookies to track visitor when they interact with your website and your Facebook ads.

How you use Facebook pixels?
How can you use the Facebook pixel? There are some ways the pixel can help enhance your Facebook marketing results.
Facebook conversion tracking
The Facebook pixel helps you to understand how a user interacts with your site after viewing your Facebook ads. You can even track consumers across their devices. This allows you to know if people tend to see your ads on mobile devices but turn to a desktop before purchasing. Or, maybe it’s the other way around. This information can assist you to clarify your ad campaign and adjust your return on investment.
Facebook retargeting
Facebook retargeting pixel data and dynamic ads assist you to display targeted ads to the audience who have already visited your website. For example, you can provide an advertisement for a potential customer with the exact product that they left in the shopping cart or added to a Wishlist on your site.
Generate lookalike audiences
Facebook can utilize its targeting data to assist you to create a lookalike audience of the user who has similar likes, interests. And demographics for people who were already taken some actions on your website. This can help grow your potential customer base.
Create high-converting Facebook Ads
Facebook tracking pixel data allow you to optimize your Facebook ads for distinct conversion events on your site. If you don’t use a pixel, the only conversion you can optimize for is link clicks. With the Facebook pixel, you can increase your website’s conversion rate that adjusts more exactly with business intention, like purchases and sign-ups.
Optimize Facebook ads for value
Because Facebook gathers data on customers who purchased from your website and how much they spend. It can assist to optimize your ad target audience based on value. That means it will automatically display your ads to the audience who are most likely to make high-value purchases.
Access more Facebook ad tools and metrics
Want to use web conversion campaigns, custom audiences from your website, or dynamic ads? You can only do so if you’ve installed the Facebook pixel. You also need the Facebook pixel to track metrics like cost per lead or cost per conversion.
How to set up the Facebook pixel Magento 2?

1. Download and Install the Facebook Pixel
Firstly, you need to download a Facebook Pixel extension. Once you have downloaded this, you can view the app directory from the root directory of your website. Then make directories: code/Apptrian/FacebookPixel. You can then unzip the module file your downloaded. Upload this to app/code/Apptrian/FacebookPixel.
2. Run the CLI Commands
The next step for setting up a Facebook pixel to Magento 2 is to run the CLI commands. To do this, launch an SSH terminal.
To enable the module to run this command:
php bin/magento module:enable Apptrian_FacebookPixel
Next, to upgrade the setup, enter the following command
php bin/magento setup:upgrade
Deploy static content:
php bin/magento setup:static-content:deploy
Finally, the last thing you need to do is clean and flush the cache.
php bin/magento cache:clean
php bin/magento cache:flush
Step 3: Configure the Facebook Pixel Code in Your Store
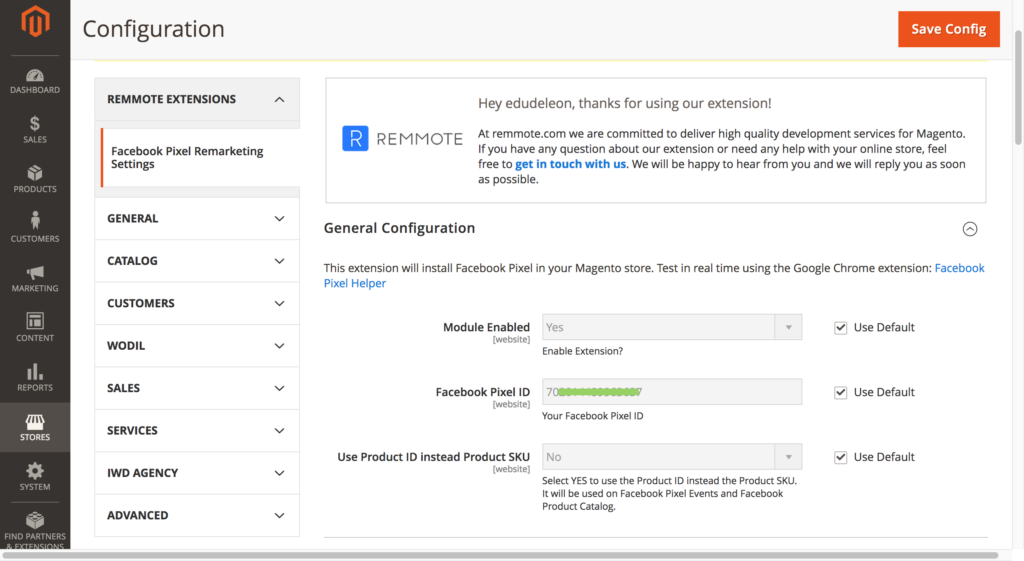
In the step, you need to head on over to open Magento 2 admin panel. You will then need to look for ‘STORES’ and underneath this, you should find ‘Configuration.’ You can then hit on the ‘Facebook Pixel.’
Click on Facebook Pixel under EXTENSIONS:
Then click Yes from Enabled and enter your Facebook Pixel ID.
After placing your Facebook Pixel ID on the Magento 2 store. You need to save the configuration by clicking the Save Config button which you can see at the top of the page. Once you have finished all of these steps, you can then double-check that your Facebook Pixel has been integrated into your Magento 2 store
Step 4: Verify Facebook Pixel successfully integrated
Lastly, you will be required to verify that the Facebook Pixel was successfully integrated into your Magento 2 store. To do this, install the Facebook Pixel Helper to your Google Chrome browser. Then, when releasing the store and you’ll see the Facebook Helper icon. Hit this icon and if the pop-up display then the Facebook pixel has been successfully combined.
Wrapping up
acebook Pixel is a helpful tool that helps you measure your Facebook Ads, track conversion, and get significant insights into users for remarketing. If you would like to find out more or need help with implementation, contact us. At Magesolution, you can hire certified Magento developers to work on your new or existing online store. From website development services to maintenance & support services, no matter what your needs are, our Magento Development Packages will all provide you the most effective solution to help your online business grow and sustain. With over 14 years of experience, we came to give solutions to over 1,000 happy clients. Contact us for a free consultation!


