Language is an important element of any mobile application or web interface. It allows users to understand the text, menus, and other content of platforms like a website, eCommerce platform like Magento 2, and lots more. A language pack is a set of files that a user can download and install from the internet. This file allows the user to use an application or web platform in a language other than the original one that was used to develop such a platform. In simpler terms, a language pack allows a user to change the language settings and font characters to their desired options.
Magento has taken appropriate steps to ensure that the installation of any language pack from its marketplace is straightforward. Store owners who want to install a new language package just need to access Magento’s marketplace and follow the necessary instructions.
In this article, we are going to discuss the basics of a language pack, the benefits and how to install in Magento 2.

The benefits of language pack
1. Appeal to a Larger Audience
Many online shoppers might be coming to your eCommerce site from different parts of the world. If a large number of them cannot read or understand your website, you might lose all of these potential customers and business prospects. However, if your eCommerce site is multilingual, you will capture their attention, encourage them to buy from your site, and even become loyal customers. In other words, a multilingual site is an appealing feature that can help you expand your customer base and facilitate sales in the process.
2. Stand out from Your Competitors
If you find yourself offering the same products and commodities as your competitors, then you need a competitive edge. Your ability to communicate with all customers in their native language is a cost-effective way to stand out from your competitors. A site with language pack enables you to market your products and also create stronger relationships with existing customers and potential buyers online. This way, your site will gain wider exposure and maintain the lead ahead of your competitors.
How to Install a Language Pack in Magento 2?
Here is a step by step guide on how you can install a language pack in Magento 2.
Note: For you to fully use the Magento 2 platform, you have to register on the site. This gives you full access to all the features the platform has to offer.
Step 1
Go to any browser you like (preferably Google Chrome) and type in the search term Magento. On the search engine result page, you will see a long list of different options. Select the option “Magento eCommerce Software and Platform”.
Click on the link, and you will be taken to a display screen showing different Magento information and pages.
On the new page, look for the search icon and type the name of the new language pack you want. For example, “Spanish Language Pack”.
Afterward, click on the tiny magnifying glass and wait until the search results for your search term shows up. You will be shown a long list of different options.
Select the link that indicates the language pack of the language you input initially into the search bar. In my case, I will click on the link that says “Magento Community Modules Spanish (Spain) Language Pack”.
Step 2
The Magento Community Modules Language Pack link you select will take you to a new page. This page is where you will download the package onto your computer.
On this same page, you can see the overview of the package, read the release notes, reviews, and questions & answers about your language pack. There is also a popularity score that shows how popular the package is in the Magento marketplace.
Find the “Install Now” option and click on it. Accept the extensions license agreement and also check the Get Extension Key icon.
Step 3
Note: If you do not have an account, you must register to proceed with the remaining steps. However, if you are already logged in, you can check the “Select Key” button. This will highlight a specific URL that you will have to copy.
Step 4
After copying the URL, go to a new tab on your browser and follow the proper steps to log into your Magento Admin Panel. Once you are logged in, search for the “System” option on the top menu. Click on it.
Scroll down to Magento connect, select Magento Connect Manager. After selecting this option, you will be shown a new login panel. You are to use the same details for your admin panel to log in.
On the next page under extensions, look for “Install New Extensions”. Under this is the “Paste extension key to install”. In the space provided, paste the URL you copied initially from the language pack page. Click “Install”.
After it loads, a fresh feature will appear below. Click “Proceed”. This will install the language pack for you. The installation will take some time to complete. Once the “Cache cleared successfully” message appears, open or refresh the Magento dashboard page again.
Step 5
On the Magento Dashboard page, go to Systems on the top menu, scroll down to Manage Stores. Click the Create Store View option in the top right corner of your screen. Fill in the accurate information in the empty fields and click Save Store View.
Step 6
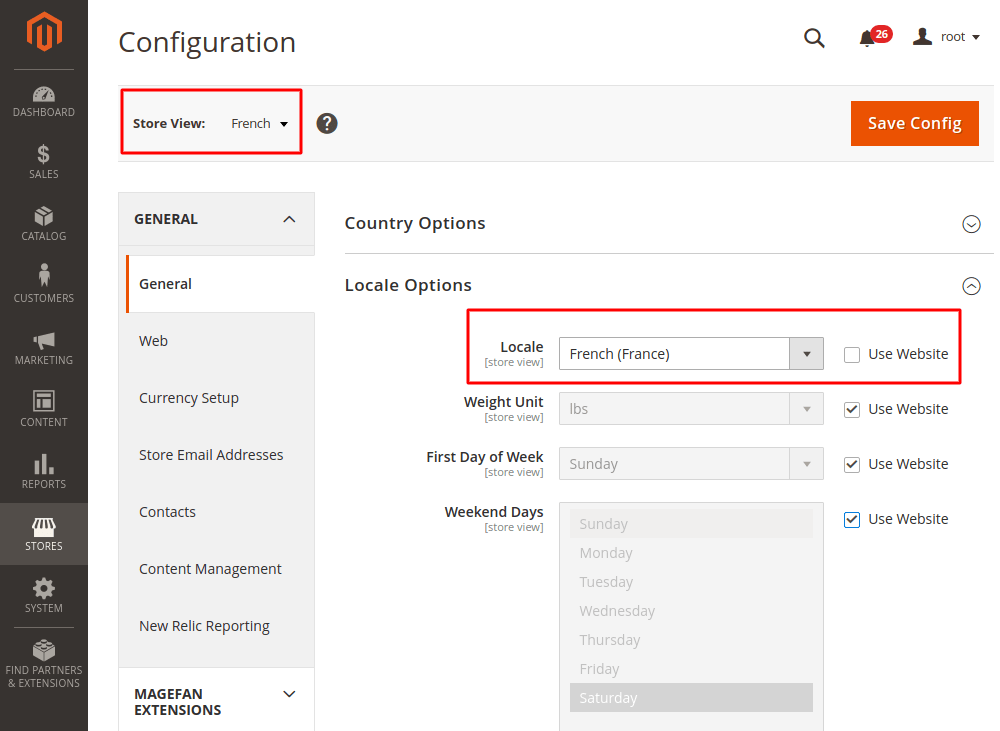
Go back to Systems on the top menu. Select Configuration. From the current configuration scope on the left side of your screen, select Spanish. Under general, at the center page, check for Locale Options, then Locale. Afterward, select Spanish (Spain). Click Save Config.
Step 7
Go back to the top menu, click on System, and choose the Design option. Click Add Design Change in the top right. On the New Design Page select Spanish for the “store” field and your current theme for the “custom design” field. Click Save.
Step 8
Clear Magento Cache and open the front page of your eCommerce website. Select the new language from the “Your language” box in the top right corner. Refresh the page.
Step 9
Note: Your template may have custom CMS blocks that you will need to recreate for the new language layout. Go back to the Magento Admin Panel, under CMS select the Static Block option. After it loads, copy the URL of this page and paste it into a fresh tab and allow it to load.
Step 10
Click Add New Block and recreate the existing custom blocks like Footer Links, Footer List 1, Footer List 2, Custom Tabs, header links, and any other important option depending on your theme. The code can be taken from the existing block and changed manually. Copy and paste the code for all the custom blocks assigned to a specific language.
Step 11
Refresh the page of your eCommerce store, and that’s it―Congratulations, you’ve just installed a new language for your storefront.
Conclusion
The steps above are an easy way for you to quickly install a language pack for your online store from the Magento 2 marketplace. Your Online Store is your moneymaker. You want to ensure that everything is done right, to lessen the chances of errors and costly mistakes. If you have tech experience, this should be a straightforward task for you to complete. However, if you are not tech-savvy or do not have any bit of experience you can always request assistance from experts in the field. We – Magesolution – a Magento website development company, cover all the website development needs of online entrepreneurs. From prototyping to building to customization, you will get a high-performing, feature-packed, scalable, and secure eCommerce website.


