Magento 2 Module development trends are increasing rapidly while Magento launches the official version. In this today tutorial, we will show you how to build a new custom module in Magento 2 to add customized features and offer you more control over the Magento store. We’re going to create a very simple module in Magento 2. Then done, the module’s output will say “Hello world!” in the block content on a custom frontend route.
Latest Update: We’ve just released the version 2.0 of Claue Multipurpose Magento 2 Theme, with with a bunch of performance improvements and exclusive features. Check this theme out now: Claue Magento Theme 2. 0
Claue – Clean, Minimal Magento 2&1 Theme is an excellent template for a modern and clean eCommerce store with 40+ homepage layouts and tons of options for shop, blog, portfolio, store locator layouts and other useful pages. Claue version 2. 0 comes with a bunch of exclusive features including:
- Being based on Luma theme.
- Meet all standards of Magento Theme
- Significant performance improvement
- Compatible with most third-party extensions.
- Fully compatible with Magento 2.4.x
This second advanced version completely differentiates from its previous one. Thus, if you are using Claue version 1 and want to update to Claue version 2, you can only rebuild a new website no rather than updating from the old version. Now, let’s get back the main topic.
Magento 2 module development
Magento is currently the largest open-source eCommerce platform in the world. Because of its function-rich and extensible codebase, retailers with large and small operations all around the world have been using it for a variety of projects. A Magento 2 Module is a group of directories including blocks, controllers, helpers, and models that are needed to build a specific store function. It is the central unit of customization in the Magento 2 platform. Magento 2 Modules can be built to execute multiple functions with supporting logic to improve the user experience and the website’s appearance. It has a life cycle that allows them to be installed, deleted, or disabled.

Required Resources
As you know, Magento 2 is a sophisticated platform. When you need to apply some customization or develop new functionality, you need to develop a custom module. Before you start creating a module, you need a robust software architecture in advance.
1. Computer Hardware
- CPU: Debugging code uses a lot of resources from the CPU, so it is suggested to use the Intel 8th Gen Core i3.
- Hard drive: 120Gb SSD is recommended to make sure stability and data safety in the process, boost the durability, and speed up the code deployment of Magento 2 several times.
- RAM: Though 8GB is enough, you should use 12 ~ 16 Gb. During the Magento 2 module developments, it needs to open multiple tabs and compete BrowserStack, especially if using the IDE (Integrated Programming Environment).
- Display: Full HD (1920×1080 pixels) is highly recommended. More than one screen is always better.

2. Software
This is a crucial factor that determines the quality of the created Magento 2 module
- Text Editor: PHPStorm IDE should be in use to manage the code source and to take benefits of the utility. For instance, PHP_CodeSniffer is a real-time check function to test code during the Magento 2 module development process.
- Composer: Built with PHP code, Magento 2 Composer is familiar with the developers to manage the components used in the project. Download it here.
- Git: When creating Magento 2 modules, programers use git to manage code, keep track of changes, fix bugs, or update without interruption.
- Xampp: a software that allows you to host PHP easily
- Magento 2 Platform: It is recommended to get the latest versions and check the default functions, and find out which to enhance with extensions.
Prerequisites
Before we start a Magento 2 module development, there are two things people often forget and we recommend you to do:
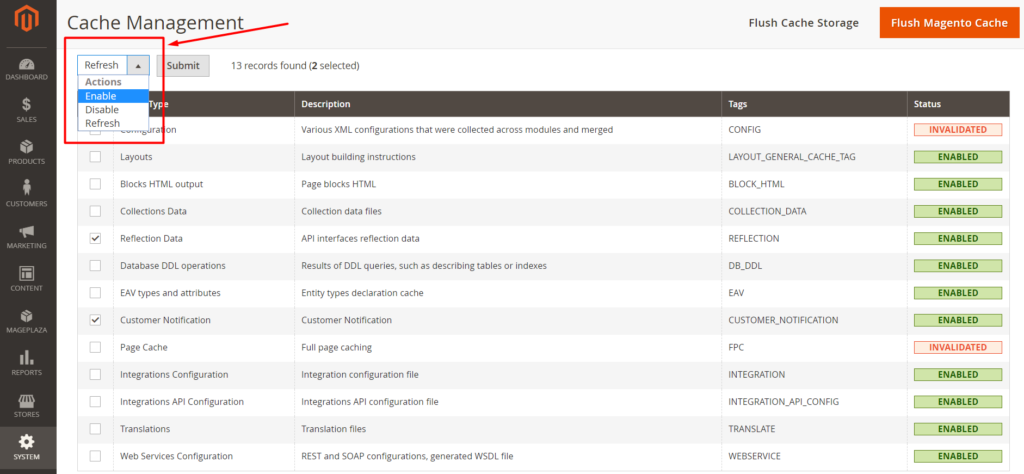
1. Disable Magento cache
Disabling the Magento cache during development will help you to save a lot of time because you won’t need to manually flush the cache every time you make changes to your code.
The easiest method to disable cache is to go to Admin → System → Cache Management → select all cache types and disable them.
2. Put Magento into a developer mode
You should put Magento into a developer mode to make sure that you see all the errors Magento is throwing at you.
In order to do this, open your terminal and move to the Magento 2 root. From there you need to follow the below command:
php bin/magento deploy:mode:set developerMagento 2 module development – Step By Step Guide
Now, we’ll discuss Magento 2 create simple module steps and follow it to build a module. To make the instruction easier to follow, we will give an example of Magento 2 module development, to be specific, Magento 2 hello world module. So, Let’s start.
Create your module folder
You need to declare a module is VendorName_ModuleName. In our example, we get a module named MGS_MyModule
Path: app/code/MGS/MyModule
Declare the new module
Path: app/code/MGS/MyModule/etc/module.xml
This file allows Magento to recognize your module along with the version it will be upgraded to. Generate a file as the above path with the content below:
<?xml version="1.0"?>
<config xmlns:xsi="http://www.w3.org/2001/XMLSchema-instance" xsi:noNamespaceSchemaLocation="urn:magento:framework:Module/etc/module.xsd">
    <module name="MGS_MyModule" setup_version="1.0.0" />
</config>
Register the new module
Path: app/code/MGS/MyModule/registration.php
This file helps to register your extension with the Magento system. Generate the file to add this content:
<?php
\Magento\Framework\Component\ComponentRegistrar::register(
    \Magento\Framework\Component\ComponentRegistrar::MODULE,
    'MGS_MyModule',
    __DIR__
);
Enable the new module
At this step, you will need to follow the below commands to work. You need to open a terminal in your root Magento folder as the following instructions:
When you first build a new module, you need to view the list of a module to ensure your module is recognized:
php bin/magento module:status
You will see your new module at the end of the disabled module list. To enable it, follow the commands
php bin/magento module:enable MGS_MyModule
To ensure it work well, type:
php bin/magento setup:upgrade
To prevent the layout from being broken, follow the commands
php bin/magento setup:static-content:deploy -f
In case you need to disable your module, type:
php bin/magento module:disable MGS_MyModule
Create a route name
The route is the URL path that allows you to connect to specific pages. In Magento, you can easily declare it utilizing a file rule named routes.xml
Route path contains 3 parts: [route_name] / [controller_name] / [action_name]
Create a file as path: app/code/MageSolution/MyModule/etc/frontend/routes.xml with the commands:
<?xml version="1.0"?>
<config xmlns:xsi="http://www.w3.org/2001/XMLSchema-instance" xsi:noNamespaceSchemaLocation="urn:magento:framework:App/etc/routes.xsd">
    <router id="standard">
         <route id="magesolution" frontName="helloworld">
             <module name="MGS_MyModule" />
         </route>
    </router>
</config>
Note that the frontName helloworld will be your route_name.
Create a controller name and action name
In this step, you will need to declare the other 2 parts of the URL path.
Generate the action file as app/code/MGS/MyModule/Controller/Index/Index.php
Note that, the folder name Index will be your controller_name, and the file name Index will be your action_name, based on the route path we mentioned in step 5.
Use the below commands
<?php
namespace MGS\MyModule\Controller\Index;

class Index extends \Magento\Framework\App\Action\Action
{
  public function __construct(
\Magento\Framework\App\Action\Context $context)
  {
    return parent::__construct($context);
  }

  public function execute()
  {
    echo 'Hello World';
    exit;
  }
}
See the result
Open your Magento folder terminal, follow the commands
php bin/magento cache:clean
Now open your web browser and connect to this URL:
http://[your_magento_url] /helloworld/index/index to see what you have done.
It will look like ours:
Online merchants always looking for more helpful solutions to increase sales, improve the UX/UI, and boost website performance. This reason lies at the heart of the increasing demand for Magento 2 module development. So, if you are able to create useful Magento 2 modules that match the requirements, you can earn lots of money. View more effective Magento 2 extensions and Themes at our store


