PayPal is one of the most well-known online payment processing systems in the world. As a result, including it in your Magento store checkout will make it more appealing to customers.
Further, for both parties, PayPal checkout is more secure. Customers may make a payment safely using their credit card or PayPal account, and retailers can be certain that PayPal will handle the transaction. Also, Magento offers a variety of PayPal payment options, making it even more adaptable and versatile. Thus, in this post, you’ll learn how to set up Magento PayPal.
How to apply Magento PayPal integration?
You must first create a “PayPal business account” or a “PayPal Payflow account” in order to use PayPal as a payment option.
Let’s go over how to set up a PayPal account before we get into the PayPal payment alternatives.
To open a PayPal merchant account, follow these steps:
- Go to manager.paypal.com and log in to your account.
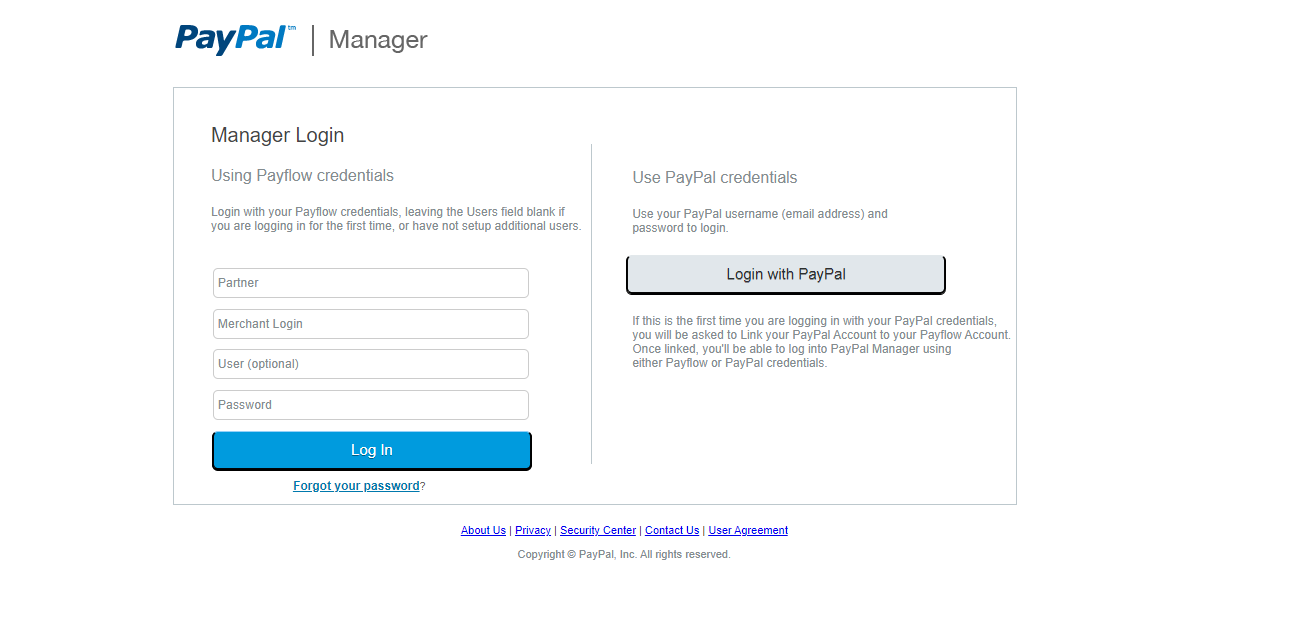
- Select Service Settings => Hosted Checkout Pages => Set Up from the drop-down menu.
- Assemble the following setups:
- AVS – No
- CSC – No
- Enable Secure Token – Yes
- Save Changes
After you’ve set up your PayPal merchant account, you may start accepting PayPal payments on your Magento 2 store.
Now, we will return to the other PayPal payment options.
Set up Magento PayPal Payments Advanced
PayPal Payments Advanced, unlike PayPal Express Payment, allows clients to pay with a credit or debit card while still on your website. Customers without PayPal accounts can finish orders since the checkout page is set in your checkout.
PayPal is PCI-compliant and offers a safe payment option to many clients. What customers have to do is click the Pay Now button on the PayPal site, fill out the PayPal-hosted form or the Pay with PayPal buttons, and checkout using PayPal Express.

It also provides Paypal Express for your convenience, as well as necessary, basic, and advanced options.
To set up Magento PayPal Payments Advanced:
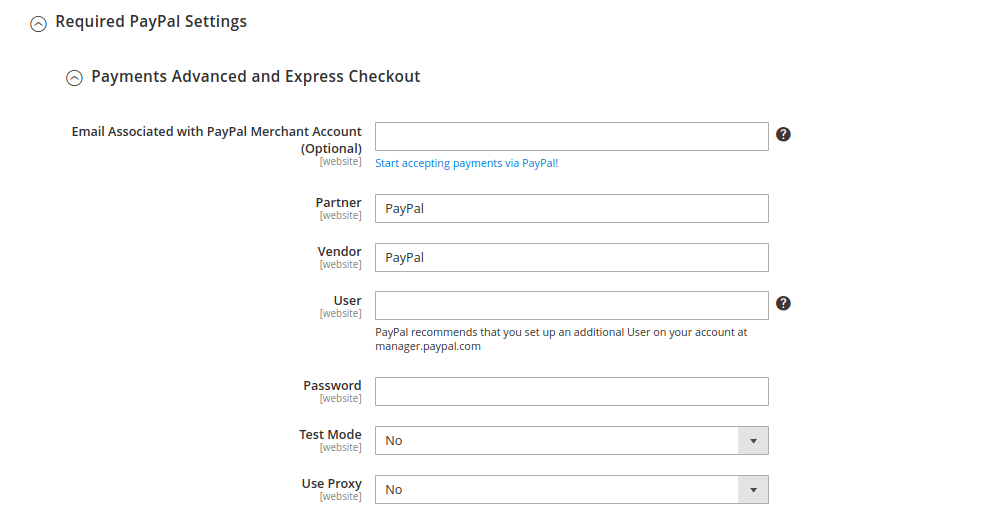
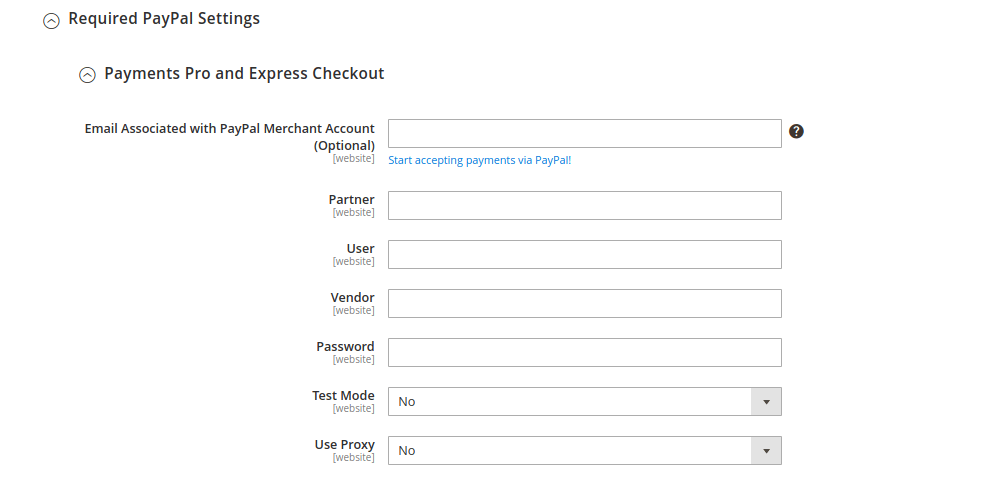
Step 1: Set up the PayPal Requires Settings
- Fill in the email address linked to your PayPal merchant account.
- Set the partner ID in the Partner field, the user login name in Vendor, and any other User IDs linked with your account in the User ID field.
- Enter the password for your PayPal account.
- If you want to execute test transactions in the sandbox, allow Test Mode.
Note: When testing, use just the credit card information supplied by PayPal and turn off the test mode before going live.
- Allow the Proxy if you’re using a proxy server to link Magento and PayPal. Set Proxy Host and Post in this scenario as well.
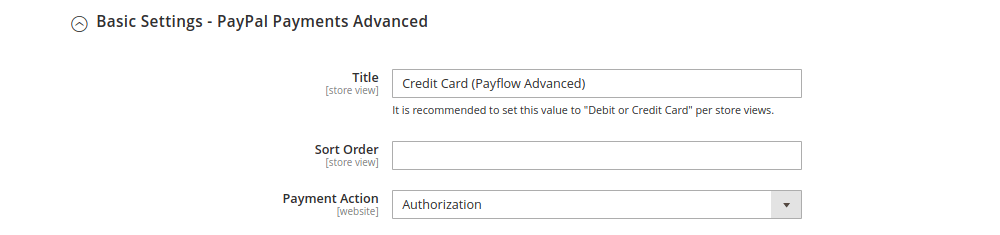
Step 2: Fill out the Basic Settings
- Fill in the title that will appear on the checkout page.
- Set the Sort Order for PayPal’s Advanced payment method, which determines where it will be put among other payment methods.
- Choose a payment action.
Authorization – means that the order has been approved, but the funds have been placed on hold. The funds must be “captured” by the merchant.
Sale – The cash is promptly deducted from the customer’s account after the sale.
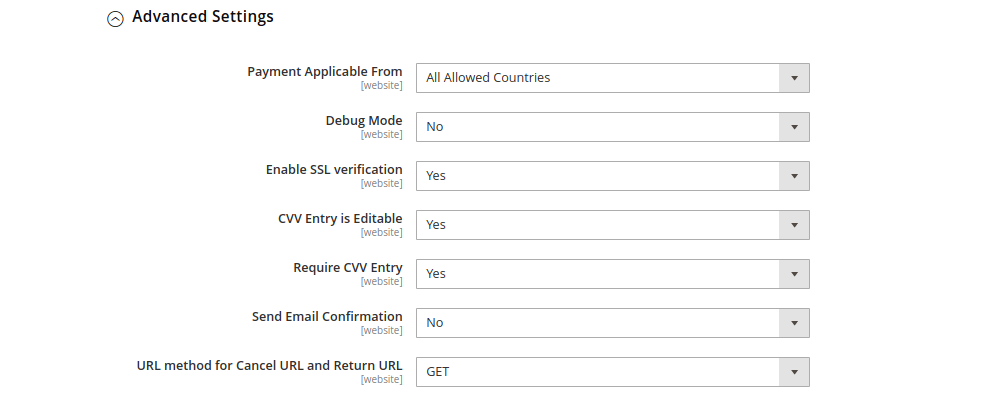
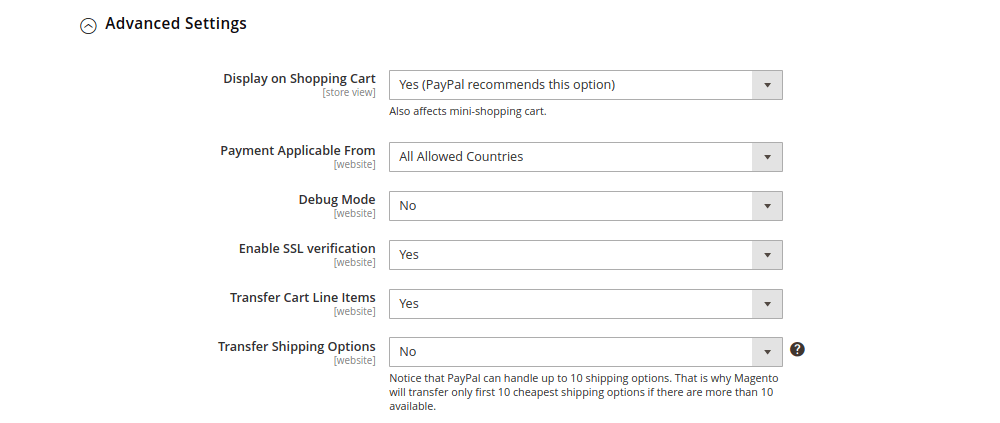
Step 3: Look at the Advanced Settings
- For Specific or All Allowed nations, select the Payment Applicable From option.
- If you choose the Specific Nations option, you must choose which countries you want to include.
- To save payment system communication in a log file, enable Debug Mode.
- To verify the host, enable SSL verification.
- Select whether or not CVV entry is required and whether or not CVV entry is editable.
- In the Send Email Confirmation section, choose whether or not you want to send an order email notification to a customer.
- In the URL method for Cancel URL and Return URL, provide the method for exchanging transaction information with the PayPal service.
GET — retrieves the information produced by the process.
POST — offers a data block for data processing, such as information entered in a form.
You must also complete the PayPal-required Settlement Report Settings and Frontend Experience.
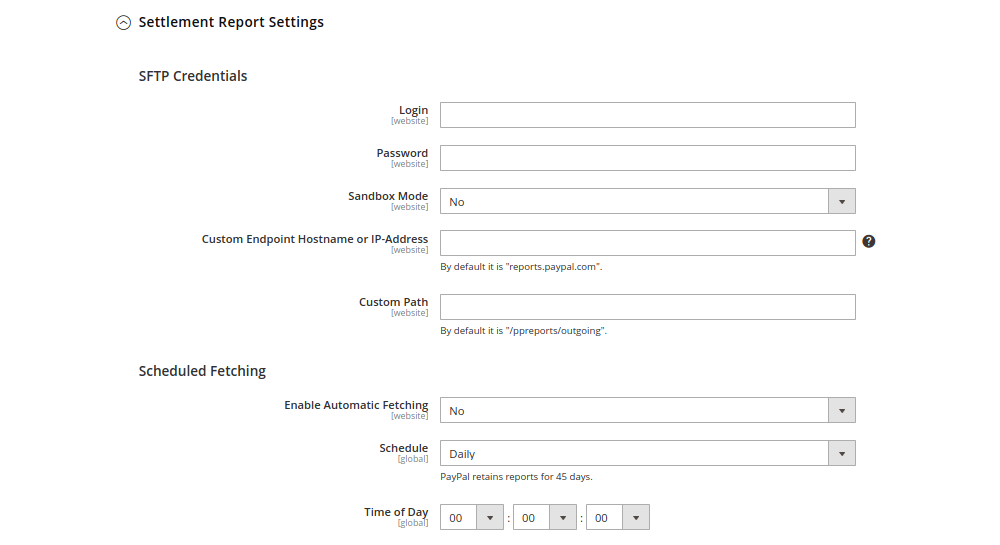
Step 4: Configure the Settlement Report Options
- Fill in the SFTP Login and Password fields.
- To test transactions before going live, enable Sandbox Mode.
- Set the Custom Endpoint Hostname or IP Address, as well as the Custom Path to save reports.
- To create reports on a schedule, enable Automatic Fetching.
- In the Schedule area, specify how often fetching will occur, as well as the Time of Day.
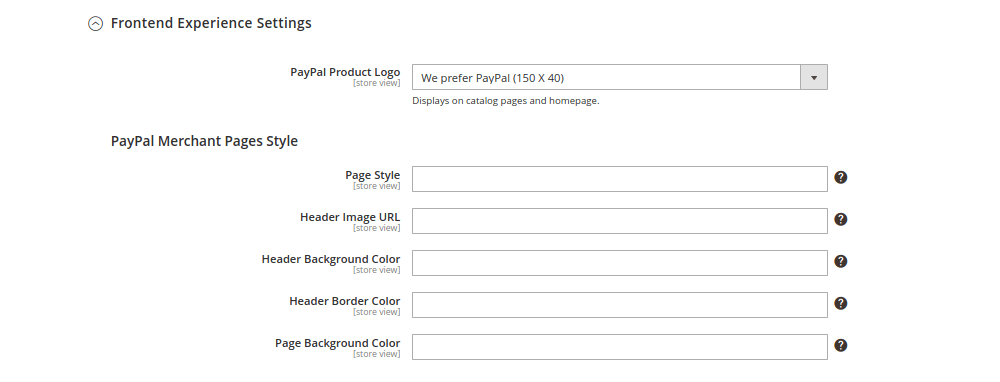
Step 5: Edit the PayPal buttons, logo, and page styles under the Frontend Experience area
- Choose the PayPal Product Logo from the drop-down menu.
- Create a page style.
- Enter the URL for the Header Image. It will be visible on the checkout page’s upper left corner (max 750×90).
- Set the six-character codes for the Header Background, Header Border, and Page Background Colors without the [#].
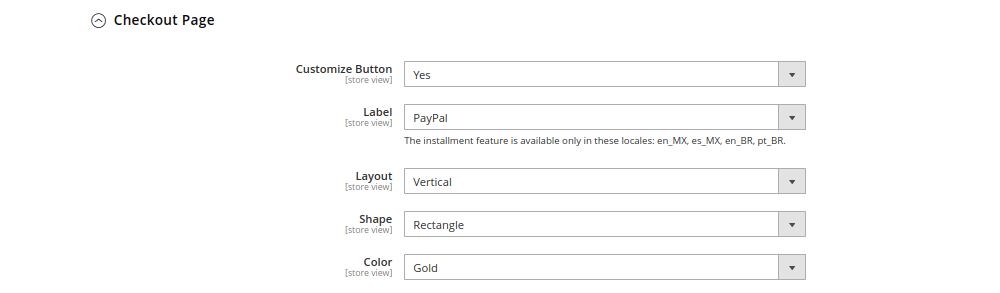
- Checkout, Product, Cart Pages, and Mini Cart Smart Buttons can all be customized.
- Choose a label, a layout, a shape, and a color.
- If needed, disable Funding Options.
That concludes the PayPal Payments Advanced section; now we’ll move on to the remaining options.
Magento PayPal Payments Pro configuration
Another Magento PayPal option is PayPal Payments Pro. It’s the ideal blend of payment convenience, merchant account management, and a fully customizable checkout experience.
PayPal Express Checkout is also included. But, it is exclusive in the United States, the United Kingdom, and Canada.

Customers can either continue on your website or be transferred to the checkout page after placing an order using PayPal Direct Payment — PayPal Payments Pro or PayPal Express Checkout.
To set up Magento PayPal Payments Pro, follow these steps:
Step 1: Under other PayPal Payment Solutions is where you’ll find PayPal Pro.
Step 2: For Payments Pro and Express Checkout, configure the required PayPal settings. They’re identical to PayPal Advanced.
- Enter the PayPal Merchant Account Email, which should match the email address in your PayPal merchant account.
- Fill in your PayPal Partner ID, Vendor as the user login name, and User as the ID of the additional user with whom you’re sharing your PayPal account.
- Enter the password for your PayPal account.
- If necessary, enable Test Mode and Proxy.
- This solution should be enabled
- If you like, you can permit PayPal Credit
- To securely store client payment/credit information, enable the Vault Enabled option. Customers will not have to re-enter their information each time they place an order if you choose to save them

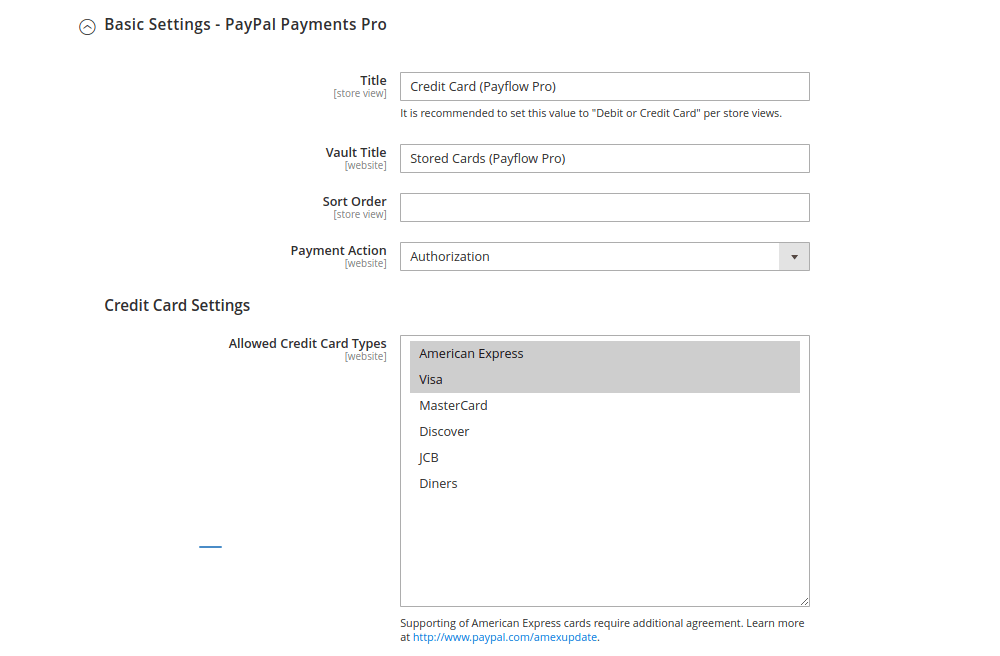
Step 3: Set up PayPal Payment Pro’s Basic Settings
- Set the PayPal Pro’s title, which will be seen during checkout. Set it to Debit or Credit Card, according to Magento.
- Enter the title of the vault.
- If you have multiple payment methods, specify the Sort Order and the Payment Action.
- To take payments on your store, select the Allowed Credit Card Types.
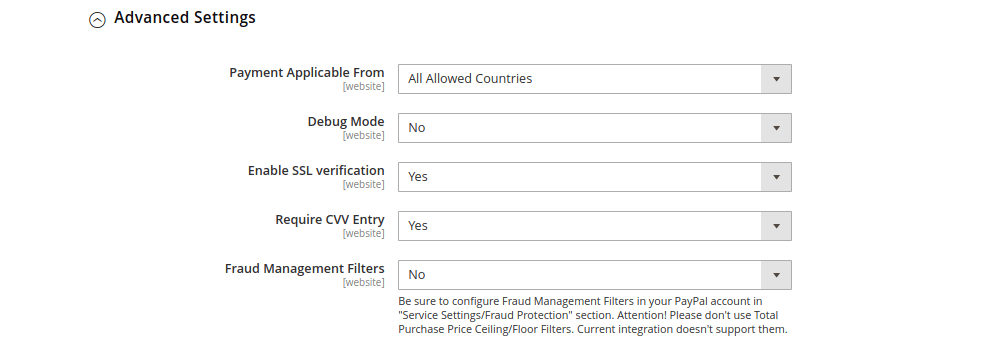
Step 4: Complete PayPal Pro’s Advanced Settings
- Choose whether the payment will be applicable to all allowed countries or only a few
- Debug Mode, SSL Verification, and Require CVV Entry should all be set.
- To detect fraud cases and hold or flag unsafe payments, enable Fraud Management Filters.
Settlement Reports and Frontend Experience Settings are available for all PayPal payment methods, as previously noted. You may learn more about how to set them up by going to the section above.
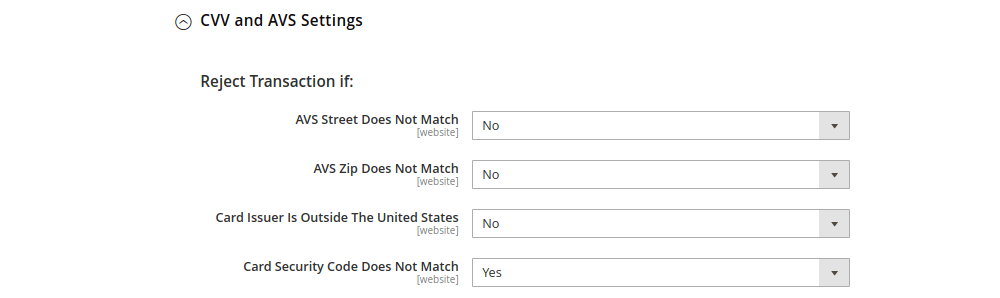
But, there is a new feature that we haven’t talked about yet: CVV and AVS Settings. When the Address Verification System finds a mismatch, it provides scenarios. The transaction is refused in such instances.
Step 5: Set up CVV and AVS Settings:
- Allow the AVS Street Does Not Match option if you wish to reject a transaction if the street doesn’t match.
- Allow AVS Zip Does Not Match if you wish to reject a transaction when a ZIP code doesn’t match.
- Allow International AVS Indicator Does Not Match if you wish to reject a transaction when the country identifier doesn’t match.
- Allow Card Security Code Does Not Match if you want to reject a transaction if the CVV code doesn’t match.
Continue with the Settlement Reports, Frontend Experience, and Paypal Express Checkout Settings when you’ve finished here.
Configure Magento PayPal Payments Standard
This PayPal payment method is available in every country on the PayPal global reference list, making it the most versatile. It enables you to add card and PayPal checkout buttons to your website.
MasterCard, Visa, Discover, and American Express are among the cards that are accepted. You can also accept payments through eBay and allow buyers to use their PayPal accounts to pay.
Customers are transferred to PayPal to complete the transaction during payment.

It’s also worth noting that you can’t use PayPal Payments Standard and any other PayPal solution at the same time.
To set up PayPal Payments Standard in Magento, follow these steps:
Step 1: Fill in the Required Fields.
- Enter the email address associated with your PayPal merchant account.
- Set the Authentication Methods for the API.
API Signature – this approach is simpler to implement and has a time limit.
API Certificate – this approach is more secure and has a 3-year expiration date.
- Depending on the option you pick, fill in the API Username, API Password, and API Signature or API Certificate fields.
- If you’re using credentials from a sandbox account, turn on Sandbox Mode.
Food for thought: To test the sandbox and disable it before going live, only use the credit card numbers advised by PayPal.
- Set the API Uses Proxy option to true.

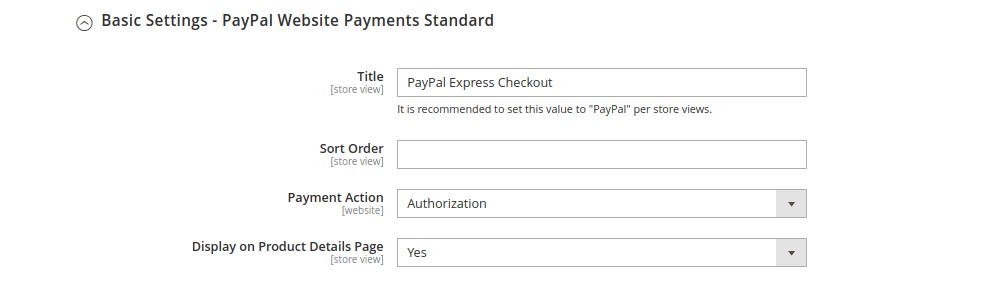
Step 2: Set up Basic Settings by giving it a title, sorting it in a certain order, choosing a payment action, and allowing the option to show it on the product details page.
Step 3: Complete the PayPal Advanced Standard Settings
- Allow PayPal Payments Standard to be accessed from the shopping and mini carts, and select the option to Display on Shopping Cart.
- Choose whether the payment will be valid in all of the allowed countries or only in a subset of them.
- Carry on using the same settings as you did with the other PayPal methods: SSL verification in debug mode.
- Choose whether or not to Transfer Cart Line Items so that the summary of each line item appears on the PayPal payment page.
- To add up to 10 shipping alternatives in the summary, use the Transfer Shipping Options option.
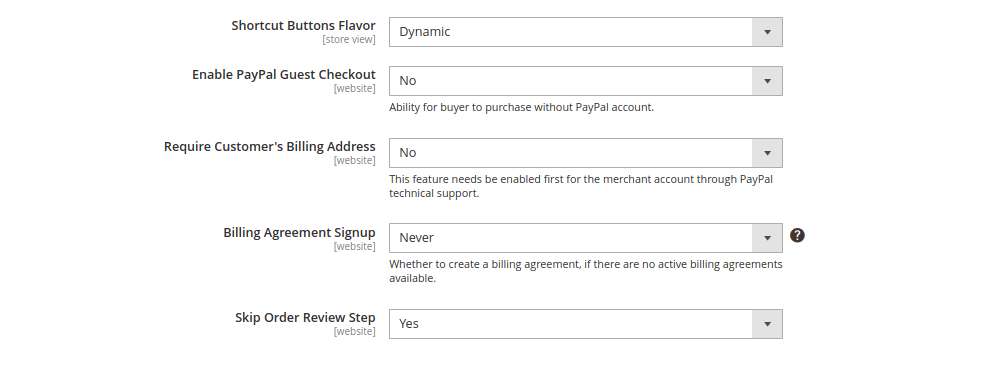
- Choose a flavor for the Shortcut Buttons.
- Whether to allow PayPal Guest Checkout or require the customer’s billing address is a decision to make.
- If you want customers to be able to enter a billing agreement with your store, select the Billing Agreement Signup option. If you select this option, you will be prompted to complete extra fields. It’s frequently thought of as a separate PayPal payment method. In the PayPal Express setting guide, we go through it in further detail.
- If you don’t want your consumers to review the order summary, decide whether to skip the Order Review Step.
Step 4: Complete the Settlement Report and Frontend Experience Settings that we previously discussed.
Set up PayPal Payflow Pro
PayPal PayFlow differs from conventional PayPal payments in several ways. Customers from the United States, Canada, New Zealand, and Australia can use it. It is a method of payment that requires retailers to pay a monthly fee as well as transaction fees.
Customers do not need to have a PayPal account to pay; they can do so by simply entering their credit card information. The customer is not taken to PayPal to complete the transaction. They remain on your site.
Payflow Pro requires the same needed, basic, and advanced settings as PayPal Payments Pro to be configured in Magento 2.
Set up a PayPal Payflow link
PayPal Payflow Link is another PayPal getaway payment method. Customers do not need to have a PayPal account to use it, just like with the previous PayPal payment options.
Unlike the other payment methods discussed in this article, however, no credit card information from customers is retained on your website. Everything goes to PayPal. Furthermore, it is only available to users in the United States and Canada.
The PayPal Payflow Link method has the same necessary, basic, and advanced options as PayPal Payments Advanced. To configure them, go to the appropriate area.
As you can see, Magento PayPal offers many payment options. The more payment options you offer, the more likely customers are to choose their chosen method of payment.
Apart from the number of payment methods offered, the way they have presented themselves is also important. Consider including icons in Magento PayPal to make them more appealing to clients.
Read also:
Conclusion
That’s all how to ingrate Paypal into your Magento stores. We expect that after this post, you will understand and choose the best way to configure Magento PayPal. If you don’t know how to integrate Magento PayPal, let us give you a hand. At Magesolution, we provide outstanding Third party integration services, which help not only you but also your customers find it easy to make a payment via PayPal. Therefore, you can increase your Magento store’s sales and conversion rates. CONTACT US for more information right now!


