Magento shipping table rate is a major challenge for all the Magento merchants. Along with the growth of e-commerce, having a flexible and scalable shipping policy is essential for every online business. In this tutorial, we’re going to look at how to configure it for Magento 2 stores, providing you the ability to charge different shipping rates to individual shoppers depended on their location.
Magento shipping table rate
Magento shipping table rate is a Shipping Method that references a table of data to estimate shipping costs depended on a fusion of dimensions such as:
- Weight v. Destination
- Price v. Destination
- Number of Items v. Destination
Different from the Flat Rate shipping, Table Rate allows you to configure Shipping rates depended on specific conditions. When it comes to the shipping fee, Table Rate Shipping in Magento 2 will support your shoppers to save and gain more loyalty.
The data that is applied to calculate tables rates are prepared in a spreadsheet and imported into your website. When the shoppers request a quote, the results display in the shipping estimate section of the shopping cart. For instance, if your storage is located in Los Angeles California, it will be cheaper to deliver to San Diego than to Vermont. You can utilize table rate shipping to pass the savings on to your shoppers
Now, we understood what the shipping table rate is, it is time to get back to our main topic today, we will learn to configure the Table Rates Shipping Method in Magento 2.
How to configure Magento shipping table rate
The table rate shipping method is an effective shipping method if anyone wants a fully customized shipping process. To finish the configuration of the Table rate shipping method, you need to follow all 5 steps.
1. Configure the Table Rate Shipping Method
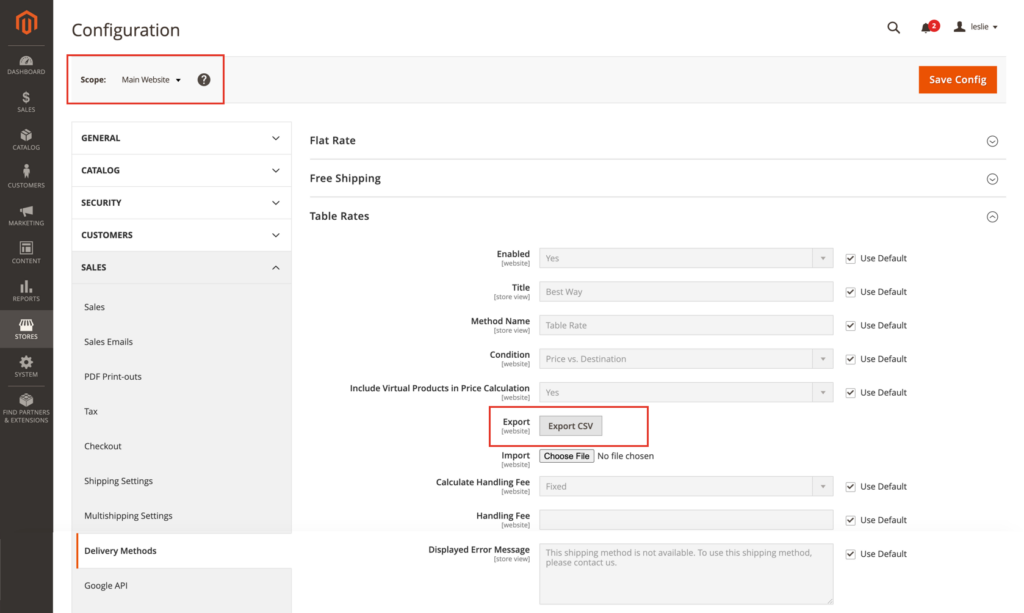
- Firstly, you log in to the Admin Panel, move to Store > Settings > Configuration > Sales > Shipping Methods
- You enlarge the Table Rates section and see the below section
- You change Enabled to Yes
- Also, you can adjust the Title and Method Name or keep the default values. These values will be displayed as labels next to the estimated rate on the checkout page.
- The condition includes 3 calculation options including Weight v. Destination; Price v. Destination; Number of Items v. Destination
- If you want to have a virtual product(s) in the estimation then, you choose “Yes” in the Include Virtual Products in Price Calculation.
- In case you want to charge the handling fees, you set up Calculate Handling Fee to Fixed or Percent and input Handling Fee. This amount will be adjusted per order.
- In the Displayed Error Message box, fill the message that shows when this method is unavailable
- Next step, you can select Ship to Applicable Countries between All Allowed Countries or Specific Countries.
- If you select Specific Countries, the “Ship to Specific Countries” will be enabled to helps you select which country you would like to implement the table rates.
- The last field Sort Order defines the order that the rates are displayed on the checkout page
- Lastly, you click Save Config to complete.
2. Complete the Estimated Shipping Rates
- In this step, you go to the upper-left corner, select Store View to “Main website” or to any other website where the configuration uses
2 new buttons will appear
- You click Export CSV and save the CSV file to your computer. After that, you open a CSV file, complete the table with the values for the shipping calculation condition
- Next, you use an asterisk (*) as a wildcard to represent all possible values in any category.
- Each row in a Country column, it should have a valid three-character code.
- Example: Price v. Destination
- Once complete, you save the CSV file.
3. Import the Table Rates Data
- Move to the Table Rates Shipping section, in the upper-left corner, you select Store View to “Main website” or to any other website where the configuration applies.
- Click Choose File button in the Import field, then you select the previous CSV file to import. Click Save Config.
4. Check the Result
- In the last step, you can test Table Rates Shipping by adding a product to the cart. Then, move to the checkout page. After finishing all the shipping info, look at the shipping estimate section, you will see values that you’ve configured before.
- Example: Add a product to the cart
- On the checkout page, you can look at that the shipping fee will be adjusted according to the rule that we used in step 2.
- When the shipping state is not chosen, the shipping fee is $15.
- When you adjust the shipping state to Alaska/Hawaii, the shipping fee will be $20.
Save Configto complete.
Remember to try conducting the payment process with different shipping addresses on the checkout page. Thus, you can ensure that the calculating for the shipping as well as handling rates are absolutely accurate.
Useful tips: You can use table rates to generate free shipping conditions.
That’s It.
Conclusion:
If you’re running an online business that sells physical products to shoppers, having a flexible shipping policy is an important element to adjust and implement shipping policies over the different regions you intend to sell to. We hope that you got a comprehensive guide on the Magento shipping table rate and understand how to configure it for Magento 2 stores. However, if you find anything unclear about these solutions or any other procedure related to this method, then feel free to contact our Support Team. We’re very pleased to support you In case of any difficulties,![]()
Besides, if you are looking out for a cost effective Magento package for your eCommerce store, then look nowhere other than Magesolution. We not only offer an affordable Magento Development Package for all size and budget but also ensure that it helps your online business grow and sustain. Contact us for a free consultation!


