Magento authorize.net allows your customers to finish the transaction process while remaining in the website, instead of being redirected to the third-party website. All you need to do is to set it up and start accepting secured payments. In this article, we’ll discuss benefits of the Magento Authorize.net and how to set up it in Magento 2.
What is Magento authorize.net?
Authorize.Net is an on-site payment gateway which supports the customers complete the checkout process without leaving the website. As you know that, Magento 2 supports multiple payment methods right out-of-the-box like Paypal, Payoneer, etc – plenty of them are third-party solutions. However, to finish the checkout process, shoppers have to leave your website and visit the payment service provider’s website.
With the support of Authorize.Net, instead of leaving the store, all information and data is transferred through a secure gateway, which greatly provide a smooth online shopping experience for the customers. More than that, the Authorize.Net Direct Post is helpful for Magento 2 site that owns a plenty of stores as merchants who can totally manage their checkout pages. By having accounts on Authorize.Net, they will finish all checkout content and forms on their website. In fact, this will deliver more security for merchant payment information as the form is posted to Authorize.Net’s secure servers
How to configure Authorize.net in Magento 2?
Below are three steps that you need to follow if you are willing to configure Authorize.net in Magento 2.
- Setup a direct post to the authorized .net
- Connect authorized.net account
- Configure the system
Step 1: Setup a direct post for Authorize.net
Firstly, you need to move to Stores > Configuration > Sales > Payment Methods > Authorize.net Direct Post
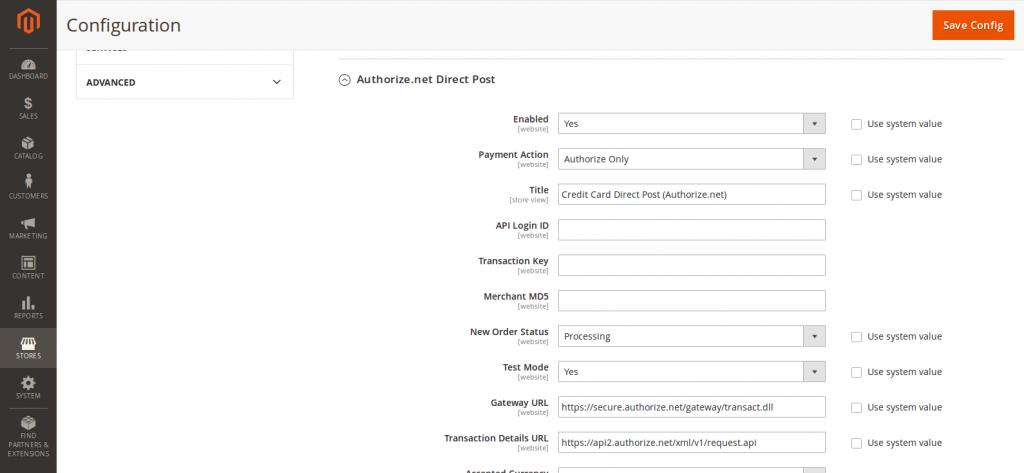
To Enabled choose Yes
For Payment Action, you can choose from multiple options, select whichever is suitable for you. Below is the description of each of the two selections for you to get a clear idea:
- Authorize and Capture: Funds on the shopper’s card are authorized and captured by Authorize.Net, and the order and invoice are generated in your website’s Admin.
- Authorize Only: Funds on the shopper’s card are authorized by Authorize.Net, and the order is generated in your website’s Admin. You can later generate an invoice and capture the funds.
After that, you enter the name of the payment option in the Title field.
Step 2: Connect to Authorize.net account
Next step, we need to fill in the below data of our Authorize.net account including:
- API Login ID
- Transaction Key
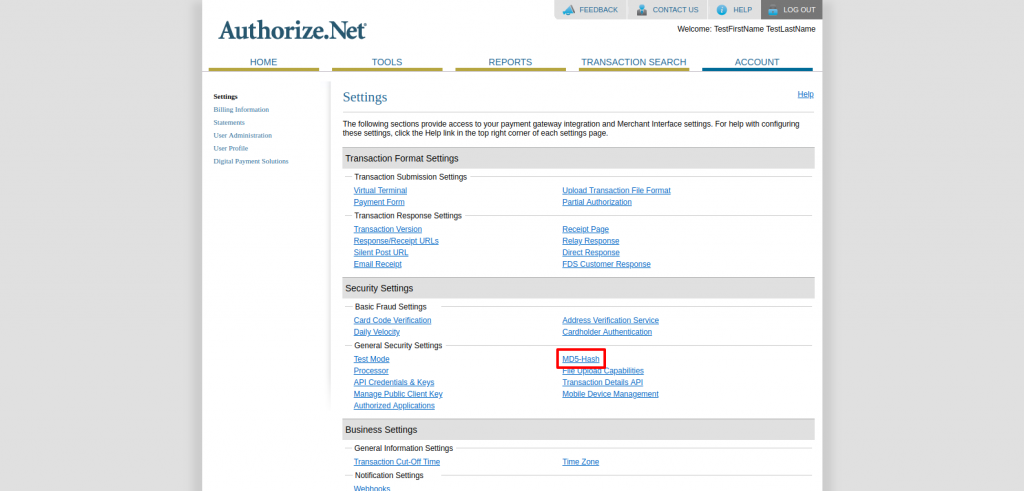
In Merchant MD5 box, you have to fill in the data from your Authorize.net account at Account > Settings > Security Settings > MD5-Hash.
Next step, you need to select one of the following options for the New order status drop-down as shown below:
- Suspected Fraud
- Processing
With Authorize.net you can easily test the performance first in order to check if there is any bug. Also, you can test and turn it off when you make sure that everything is work well and your system is available for running.
In Gateway URL box, you have to fill in the default link from Authorize.net, the default link for the same is: https://secure.authorize.net/gateway/transact.dll
Step 3: Configure the system
Set up Accepted Currency.
To save messages transmitted between your online store and the Authorize.Net Direct Post system, set up Debug to “Yes.”
After that, In the Credit Card Types list, choose each credit card that is accepted in your store.
Also, if you want the shoppers to enter a card verification value (CVV), set Credit Card Verification to “Yes”.
For Payment from Applicable Countries you have 2 options
- All Allowed Countries: Shoppers from all countries specified in your store configuration can use this payment method.
- Specific Countries : After selecting this option, the Payment from Specific Countries list appears. Choose each country in the list from where shoppers can make purchases from your website.
Choose the Minimum Order Total and Maximum Order Total for Direct Post transactions.
Enter a Sort Order number to decide the position of Direct Post in the list of payment methods during checkout.
At last, Hit the Save Config button to complete the Authorize.net configuration.
Conclusion
Above is a simple guide to how you can quickly configure Authorize.Net at your Magento 2 website. If you have any error when following our instruction, then you can get in touch with Magento experts for any free support. Other than that, there are still many other areas of improvement a Magento 2 store owner should consider. Visit our website to see the affordable and best-in-class Magento Customization Services.


